Report: Create a Simple Word Report with a 3D Model


The Report component enables the user to create highly customizable reports in PowerPoint, Word and HTML containing interactive 3D models.
The report is generated from on a template file which is a normal PowerPoint presentation, Word document or HTML text file. Using tags, we mark the parts of the template which should be replaced with data from our simulation. To help you add these tags, we have provided a MS Office add in, but you can create your templates using just your installed Office products.
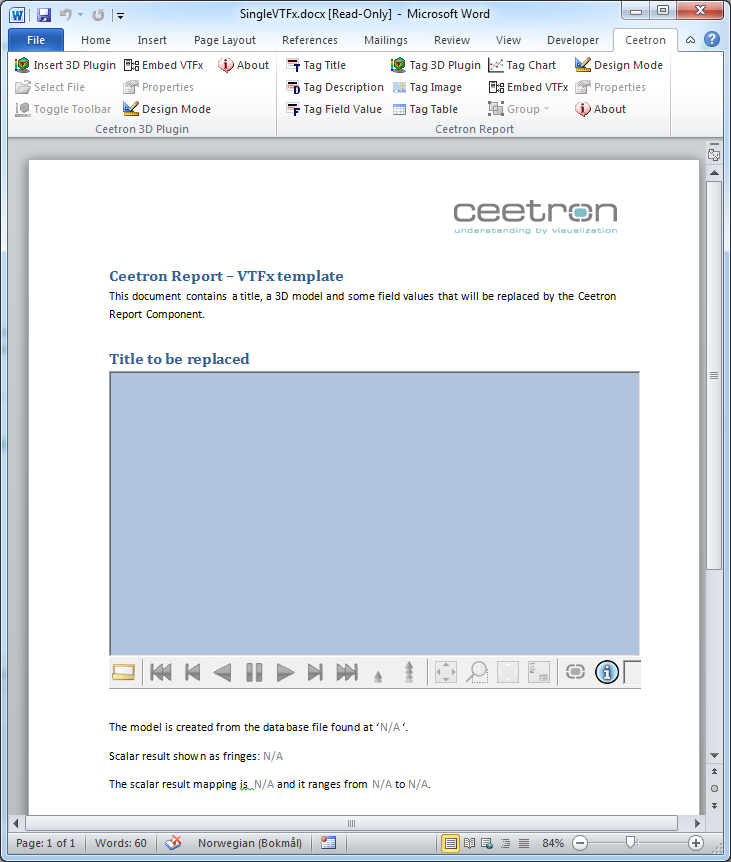
This tutorial shows how to create a Word report where the 3D model from your view is inserted (and embedded) into the Word document along with some metadata.
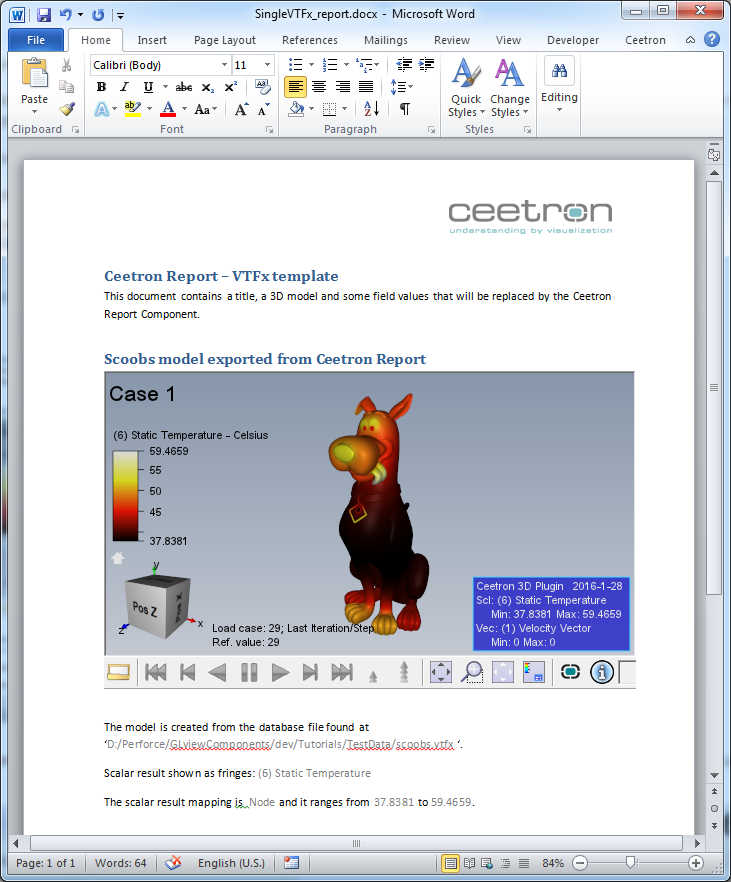
Figure below are showing the template Word document on the left and the generated report on the right:
Load the file and setup the model specification to show the result. For a more thorough explanation on creating a data source from a file interface and setup the model specification, see the Load VFTx tutorial: UnstructGrid: Load Model from File and Set Up Model Specification
Note
This tutorial expect the application to have a correctly configured cee::vis::View
in place. See demo applications on how to set up a cee::vis::View in your application.
Load model
Create the model and a VTFx file interface data source. Open the file and set the created data source in the model.
    // Create the model and data source
    cee::PtrRef<cee::ug::UnstructGridModel> ugModel = new cee::ug::UnstructGridModel();
    cee::PtrRef<cee::ug::DataSourceVTFx> source = new cee::ug::DataSourceVTFx(42);

    // Open the VTFx file
    cee::Str vtfxFile = TutorialUtils::testDataDir() + "scoobs.vtfx";
    if (!source->open(vtfxFile, 0))
    {
        // VTFx file not found
        return;
    }

    // Add the data source to the model
    ugModel->setDataSource(source.get());

    // Add model to view. Ensure that old models are removed first
    cee::vis::View* gcView = getTutorialView();
    gcView->removeAllModels();
    gcView->addModel(ugModel.get());
Apply properties
Read model and view properties from the VTFx file and apply these to the current model and active view. We make sure to set some default view settings in advance in case the VTFx file does not contain any view properties.
    cee::PtrRef<cee::PropertySetCollection> propertyCollection = new cee::PropertySetCollection;
    cee::PtrRef<cee::ImageResources> imgResources = new cee::ImageResources;
    source->caseProperties(propertyCollection.get(), imgResources.get());
    cee::ug::PropertyApplierVTFx propApplier(propertyCollection.get(), imgResources.get());
    propApplier.applyToModel(ugModel.get());

    // Set up the initial visualization of this model
    ugModel->updateVisualization();

    // Default camera setup
    cee::BoundingBox bb = gcView->boundingBox();
    gcView->camera().fitView(bb, cee::Vec3d(0, 0, -1), cee::Vec3d(0, 1, 0));
    gcView->camera().inputHandler()->setRotationPoint(bb.center());

    // Apply properties to view
    // Apply properties after default view setup so we get a default view if camera is not specified
    propApplier.applyToView(gcView);

    gcView->requestRedraw();
Create a 3D snapshot
Using ExportVTFx we can create a VTFx file (either on disk or
just in memory) for the current model with all applied properties and the active view setup.
Properties are, for instance, current fringes scalar result or vector results visualized on the model, or
draw style/color for parts, or advanced features like isosurfaces and cutting planes. The
Image Resources object contains textures and overlay images if such are used.
    cee::exp::ExportVTFx exporter(cee::exp::ExportVTFx::DISPLAY_MODEL_ONLY, ugModel.get());

    // Add properties and resources to the export
    cee::PtrRef<cee::PropertySetCollection> propColl = new cee::PropertySetCollection;
    {
        cee::PtrRef<cee::ImageResources> resources = new cee::ImageResources;
        cee::exp::PropertyBuilderVTFx propBuilder(propColl.get(), resources.get());
        propBuilder.addFromModel(*ugModel.get());
        propBuilder.addFromView(*gcView);
        exporter.addProperties(*propColl);
        exporter.addResources(*resources);
    }
In this tutorial we are using a memory file. This file will be embedded into the Word document and the user don’t need to worry about the path to the VTFx file being broken. It’s all there inside the Word document. Just share it!
    cee::PtrRef<cee::ug::VTFxMemoryFile> memoryFile = new cee::ug::VTFxMemoryFile();
    if (!exporter.saveCase(memoryFile.get()))
    {
        // Export failed
        return;
    }
Create snapshot and repository
To create a report, we need to create a repository. A repository is a collection of snapshots, each snapshot being a “snapshot” of the model at a given setup. The snapshot can either be a 3D model, an image or tabular data (for plot or just a list of data).
In this tutorial we will create one snapshot containing a 3D model.
First, we
create a repository. Then we create a 3D snapshot and add the 3D model we created above using
Snapshot::setModelVTFx(). In addition, each snapshot can have a name, a
description and a set of field values. Field values are key and value pairs containing data from you model.
Using the key in your template, the report generation will replace it with the matching value
from your model. The Report component provides some basic field values that are populated using
cee::rep::Snapshot::getFieldValuesFromModel(). In addition to these, you can add your own field values. See
Field Values for more information.
When the snapshot is created, we add it to the repository. In this tutorial, the repository only contains one snapshot.
    cee::PtrRef<cee::rep::Repository> repository = new cee::rep::Repository();
    {
        cee::PtrRef<cee::rep::Snapshot> snapshot = new cee::rep::Snapshot(cee::rep::Snapshot::OBJECT_VTFX);
        snapshot->setTitle("Scoobs model exported from Ceetron Report");
        snapshot->setFieldValues(cee::rep::FieldValuesGenerator::getFieldValuesFromModel(ugModel.get()));
        snapshot->setModelVTFx(memoryFile.get());

        repository->addSnapshot(snapshot.get());
    }
Generate Report
Once we have the repository, we just need the path to the template file. The template file is an ordinary Word document with text and objects tagged to be replaced with the matching snapshot data in the repository. Read more about templates and tagging in the topic: Tag Behavior and Syntax
Create a creator (Word, PowerPoint or HTML) and pass along the repository and the path to the template file.
Call generate() to create and save the report to the
specified file name. The generator will create a copy of the template file, search through
it and replace all tagged objects with the corresponding data found in the snapshots in the repository.
You can now open the generated Word report and verify that the 3D model along with its title and some selected field values were inserted.
Note
To get the interactive 3D model into your MS Office documents, you will need the Ceetron 3D Plugin. The plugin is free to use and can be downloaded from Ceetron’s homepage, www.ceetron.com.
    cee::Str templateFile = TutorialUtils::testDataDir() + "SingleVTFx.docx";
    cee::rep::ReportCreatorWord generator(repository.get(), templateFile);
    if (generator.generate("SingleVTFx_report.docx"))
    {
        // Report generation failed
        return;
    }
See the complete source code here:
