Loading Models and Geometry
This tutorial has a function dedicated to loading models. The function is loadModel, which takes a filename as a string and attempts to load it from the project’s data directory. One of HOOPS Visualize Web’s native formats is the “stream cache”, or .scs format, so the function assumes the filename will have the .scs extension. loadModel will place the model in a node, give it a sequential name, and translate it into place.
async loadModel(modelName: string) {
    const modelNum = this.hwv.model.getNodeChildren(
        this.hwv.model.getAbsoluteRootNode()).length;

    const nodeName = `Model-${modelNum + 1}`;
    const modelNodeId = this.hwv.model.createNode(null, nodeName);

    this.modelList.push(modelName);
    await this.hwv.model.loadSubtreeFromScsFile(
        modelNodeId,
        "./data/" + modelName + ".scs"
    );

    let loadMatrix = this.hwv.model.getNodeNetMatrix(modelNodeId);
    const box = await this.hwv.model.getNodeRealBounding(modelNodeId);

    loadMatrix.setTranslationComponent(
      box.min.x * -1,
      box.min.y * -1,
      box.min.z * -1
    );

    this.hwv.model.setNodeMatrix(modelNodeId, loadMatrix, true);
}
Printing Plane
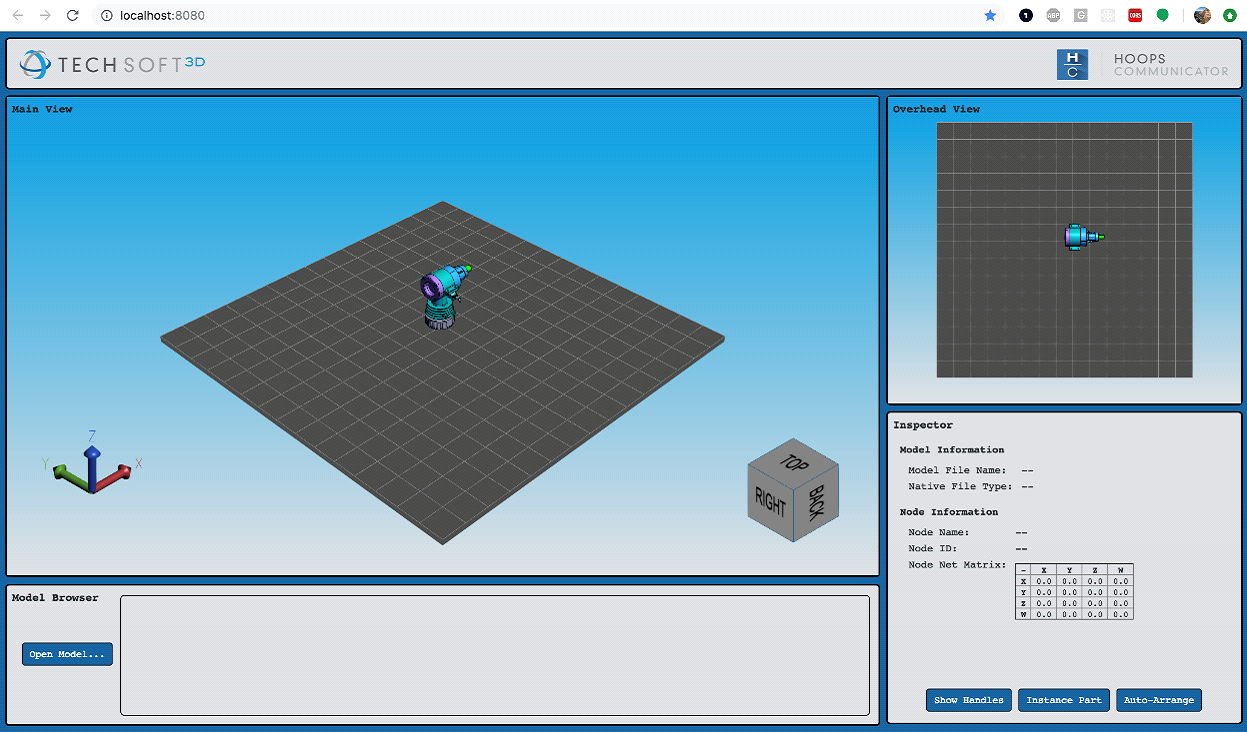
The application also features a printing plane which is defined geometrically by the application and inserted as a mesh.
import { PrintingPlane } from "./PrintingPlane";

// ...

this.printingPlane = new PrintingPlane(300, 10);
See PrintingPlane.ts for the class definition. In it, you’ll see the class constructor as well as its initialization routines. We’ll show here how this is constructed.
constructor(size = 300, depth = 10) {
    this._planeSize = size;
    this._planeDepth = depth;
    this._nodeId = null;
}

public async init(hwv: WebViewer) {
    let gridSize = this._planeSize;
    let d = this._planeDepth;
    let meshData = new MeshData();

// ...
Much of the content of the class is defining the planes and normals, and with this data you can see how polylines are combined to define the mesh itself:
for (let i = -gridCount / 2; i <= gridCount / 2; ++i) {
    let position = gridUnit * i;
    meshData.addPolyline([-gridSize, position, 0, gridSize, position, 0]);
    meshData.addPolyline([position, -gridSize, 0, position, gridSize, 0]);
}

const meshId = await hwv.model.createMesh(meshData);
Finally, the colors are set and the mesh is instantiated:
meshInstanceData.setLineColor(new Color(150, 150, 150));
meshInstanceData.setFaceColor(new Color(75, 75, 75));

this._nodeId = await hwv.model.createMeshInstance(meshInstanceData, null, null, true);
So you can see the progression of how the mesh goes from lines and faces which define a mesh, to an intermediate MeshInstanceData object, and finally to a mesh instance using createMeshInstance. Note that instancing a mesh returns a nodeId that then becomes part of the ID of the printing plane in the main part of our main application.
The logic discussed on this page enables our models to load at the origin and flush with the plane:


